What is Tray Ceiling?
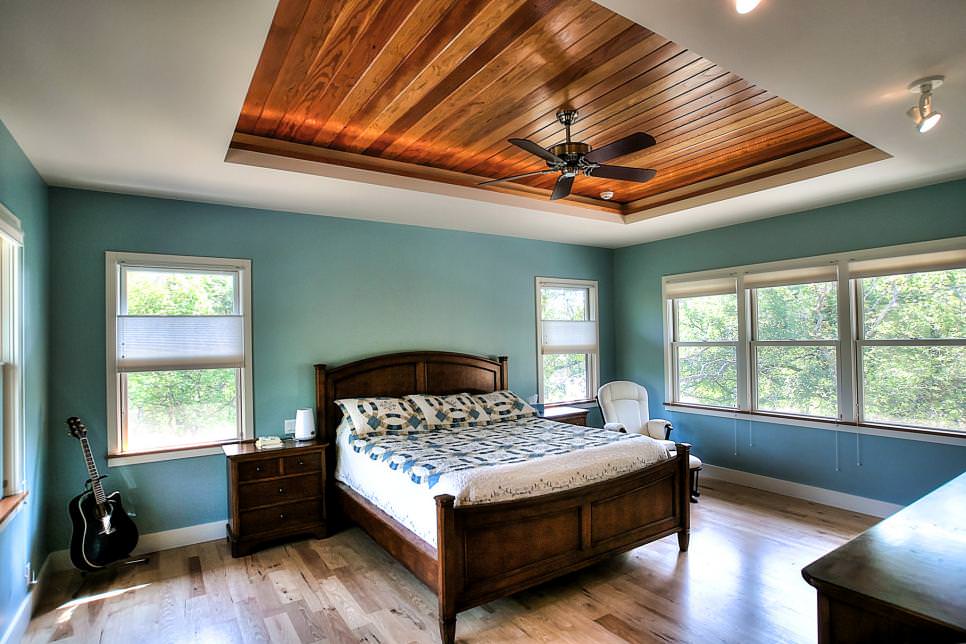
Photo: Homedit.com
The tray ceiling is a type of ceiling that is recessed into the ceiling like a large upside-down tray. It is also known as a trey ceiling and a recessed ceiling. All of these names refer to the same thing. The normal height difference between the structure’s interior and outside might range anywhere from six to fourteen inches in value.
It gives the impression that a massive inverted tray has been installed in the ceiling of the room. To create the appearance of more depth and space, the focal point of the construction is elevated a few inches (or feet) above the rest of the structure.
Pros & Cons of Tray Ceiling
Pros
- Ceilings that have trays are more for decoration than they are for practical use. In a nutshell, not only does this trend look good, but it also feels good.
- This alternate works well with a wide variety of building designs and creates the idea of having high ceilings throughout the space.
- The installation of a tray ceilings in a room can significantly boost the aesthetic value of the space.
- It doesn’t take much effort to give the impression that the room is taller, which will result in an almost immediate improvement in the atmosphere.
- It is possible that the time and work you invest in installing a tray ceiling in your home will pay off in the form of a better price when the home is put up for sale in the future.
Cons
- But before you install a tray ceiling or two, you should give some thought to the height of your existing ceilings. As a result of the tray’s drop-down border reducing the height of the ceiling, the space in the room may appear to be significantly smaller than it is in reality.
- Alternately, the drop-down border of a tray ceiling, in the event that you choose to install one in your kitchen, will define the size of the cabinets that you have available to you.
- Tray ceilings are only able to be erected in rooms that have a minimum ceiling height of eight feet.
- One more area for improvement: Due to the peculiar shape of a tray ceiling and the fact that it is comprised of two distinct levels, painting and cleaning the surface may present a marginally more challenge.
- The aesthetic value of the tray ceilings can end up outweighing the inconvenient nature of its infrequent maintenance.
Utilization of Tray Ceilings
A tray ceiling is not only aesthetically pleasing but also useful in certain situations. When ducting for an additional ventilation system is installed in an older home that was constructed before the invention of central heating and air conditioning, it is common practice to run the ducting along one side of the ceiling.
A bulk header is established on that side of the room because this only pertains to that portion of the room. As long as the ceiling of the tray is high enough, the bulk header can be concealed within the ceiling of the tray.
The recessed edge of a tray ceiling provides an additional advantage: it is the perfect location for installing other types of mechanical components, such as plumbing and wiring. This is an excellent option for residences in which it would be impractical to run the wiring or plumbing through the walls, as that is the traditional method.
Problems Associated with Tray Ceilings and Headroom
When a brand-new house is being constructed, the joists in the ceiling are frequently used to construct a tray ceiling. The inside of the tray will have a ceiling height that is greater than the typical ceiling height; nevertheless, the border around it should have the same height as the rest of the home.
Due to the drop-down border, however, adding a tray ceiling to an existing room presents a challenge in terms of maintaining the area’s existing ceiling height. Because of this, a tray ceiling should not be put in a room unless it already has a ceiling that is at least eight feet high.
The drop-down border will extend below that if your ceilings are already only eight feet high; this could make the area appear much smaller than it actually is because local construction laws typically stipulate a minimum ceiling height of eight feet. If your ceilings are already just eight feet high, the drop-down border will extend below that.
Obviously, the degree to which the tray is indented plays a part in this situation. It is fine to have a drop-down border that is up to six inches in height; however, anything higher than that is likely to diminish the impression of openness that is created in the space. When adding a tray ceiling to an existing room, considerable planning is required to guarantee that there will be sufficient headroom.
The Importance of Tray Ceilings in Design
For the sloping border, tray ceilings use dimensional timber and drywall. For a more modern, minimalist look, tape and finish the walls without corner molding. Designing a tray ceiling to match the room’s decor is achievable at any level. Crown molding inside the tray border makes a bigger statement the larger it is.
Recessed lighting can be fitted in the sloping border, and ornate molding can hide accent lights that discreetly light the ceiling tray. Due to the drop-down border’s picture-perfect framing, the ceiling tray can be proudly displayed opposite a chandelier or fan.
The tray, ceiling, or molding can be painted to match. There are several styles. The recessed tray will appear higher if painted a deeper color than the ceiling. The recessed tray looks further away and the richer tone adds depth.
Cost of Installing a Tray Ceiling
There is a significant amount of variation in the cost of installing a tray ceiling from one job to the next. The amount of available space as well as how straightforward the arrangement is are the two most crucial aspects to consider. For example, when installing a tray ceiling in an existing home, substantial work may need to be done to the ceiling joists or trusses. This type of ceiling requires additional support.
According to home improvement experts, installing a tray ceiling while a building is being constructed is a far more cost-effective option than installing one after construction is complete when the cost can soar to more than $1,500 to $5,000 or even $10,000.
Creating an Appearance Similar to That of Tray Ceilings
Homeowners who are only able to install ceilings that are eight feet high can still give the impression that the room contains a tray by affixing flat trim molding to the ceiling in the style of a conventional border. After the trim has been installed, the ceiling that is outside the border can be painted a different color from the ceiling that is inside the border so that there is a clear distinction between the two areas.
Putting in or Building the Tray Ceilings
The installation process will be different depending on whether the tray ceiling is being constructed as part of a newly constructed home or as part of an existing home that is undergoing renovations. In spite of the fact that you should probably hire a professional to install your tray ceilings, it is surprisingly easy to construct one.
A Fresh Construction
If you are interested in installing a tray ceiling in your home but do not want the ceiling to be lowered to accommodate the drop-down border, you should speak with your builder about the possibility of installing the tray ceilings when the home is initially being constructed.
If the builder decides to go with trusses rather than stick framing, the manufacturer of the trusses will design them so that they are compatible with the tray ceilings. Construction work is something that is best left to professionals, whether it be stick framing or truss set.
Retrofitting
- It is recommended that the job of modifying the ceiling joists or trusses in order to facilitate the installation of a tray ceiling is left to a structural engineer or the manufacturer of the roof trusses. It is not always a safe alternative for maintaining the structural integrity of the structure to adjust the framing.
- Permits are necessary for this project as well due to the fact that the structure of the house is going to be altered. This is something that should only be attempted by trained experts.
- If the height of the ceiling allows for it, rather than recessing the tray into the joists or trusses, which is a considerably more involved procedure, a drop-down tray ceiling can be fitted instead. This is a lot simpler option.
- The process begins with the construction of the framework for the downspout of the tray ceilings, which will subsequently be covered with drywall and finished. An experienced do-it-yourselfer who also has some knowledge of construction might install a tray ceiling like this one.
- The appearance of a tray ceiling can be fabricated by do-it-yourselfers by first adhering trim molding to the ceiling in the appropriate region and then painting the middle of the ceiling a darker color than its border. This will give the appearance of a tray ceiling.
How to Decorate a Tray Ceiling
This one-of-a-kind ceiling element can accommodate a wide range of aesthetic approaches because to its adaptability. Have a look at these pointers for achieving the look you want, and see if any of them work for you.
Which Color is Preferable?
The color scheme of a tray ceiling can make it stand out, make it blend into the background, or affect the viewer’s perception of the space above them in other ways. It is imperative that your color palette adheres to principles of simplicity and minimalism if you want to achieve a modern appearance. For a dramatic and elegant effect, paint the ceiling in a dark color that either complements or contrasts with the color scheme of the rest of the room.
By positioning them along the perimeter of the tray, you will draw even more attention to the vertical division. Creating the illusion of depth or distance within the tray by using dark colors can make the tray appear to be smaller or further away than it actually is.
Add Something Fancy (Stencils, Wallpaper, Tiles, or Murals)
Installing a tray ceiling is similar to installing a picture frame for the mural that you have painted on your ceiling. It is entirely up to you whether you want to give the tray a more understated aesthetic touch by adding stencils to the border or if you want to go all out by including wallpaper, painted murals, or patterned tiles; the options are virtually limitless in either case.
Lighting
The placement of lighting in a room has the ability to drastically change the atmosphere of the space, and tray ceilings only serve to amplify this effect. A sophisticated look can be achieved by suspending a chandelier in the center of the tray. For a simpler and more up-to-date take on the ceiling design, try incorporating recessed lighting or rope lighting along the perimeter of the tray ceilings.
Altering Shape is an Option
Because rectangular shapes may be easily molded to the existing ceiling, they are the most effective choice for tray ceilings. However, the interior can take on any shape, from a perfect circle to a diamond, or even a completely different shape entirely. Before you commit to an actual installation, you are welcome to experiment with the layout in any way you like.
Coffered Ceilings Vs. Tray Ceilings
The modern tray ceilings can trace their lineage back to a coffered ceiling, which in turn can be traced all the way back to the French Renaissance. Nevertheless, it must be made abundantly obvious that the two strategies take very different approaches to the problem at hand. The difference between a tray ceiling and a coffered ceiling is the number of inset pieces. A tray ceiling only has one.
There are also differences in the roles that are performed by coffered ceilings and tray ceilings. Because of their capacity to improve a room’s acoustics, coffered ceilings are becoming increasingly popular not only among interior designers but also among homeowners.
The installation of a ventilation system in an older home while concealing it with a tray ceiling is, however, a very inventive solution to the problem. Bob Villa asserts that the function of the dipped-down edge of a tray ceiling in contemporary buildings is to conceal unsightly plumbing or wiring.
Step Ceiling Vs Tray Ceilings
This concept is expanded upon by ceilings that have steps, which consist of a set of shelves. In its most basic form, a step ceiling will consist of at least two distinct levels; however, more intricate designs in rooms with higher ceilings can include as many as five or even more distinct levels of a step ceiling. There is no denying that the complexity of a project’s design, as well as the number of steps or recessions that are involved, will directly lead to an increase in the overall cost of the endeavor.
:max_bytes(150000):strip_icc():format(webp)/1-9f53e72a6d234a0ba940a4672b5b471f.jpeg)
:max_bytes(150000):strip_icc():format(webp)/ScreenShot2022-04-29at4.58.17PM-2ac4df032abb4c0294a386d58657bc90.png)
:max_bytes(150000):strip_icc():format(webp)/1-67d4695788364fd8918c9d5c14c2a31f.jpeg)
:max_bytes(150000):strip_icc():format(webp)/1-9d56e8743b3149f5afe026731704ce06.jpeg)
:max_bytes(150000):strip_icc():format(webp)/ScreenShot2022-04-29at4.34.14PM-cc497eae86ca47bf80969fb1eb53eae9.png)
:max_bytes(150000):strip_icc():format(webp)/1-c6db40917c8140cc9ce8afe238327592.jpeg)
:max_bytes(150000):strip_icc():format(webp)/1-8585ed6ccddb415e8514d7eb8f1cab20.jpeg)
:max_bytes(150000):strip_icc():format(webp)/ScreenShot2022-04-29at4.42.53PM-2791791f9cfc4178be819faa5b911b4a.png)
:max_bytes(150000):strip_icc():format(webp)/1-729772b0aa744c049c15f97cd544e6c8.jpeg)
:max_bytes(150000):strip_icc():format(webp)/Interior-Impressions-Lake-Elmo-MN-Leather-and-Longhorn-Living-Room-Dining-Room-Plaid-Accent-Chairs-White-Exposed-Beams-e782e5ee54414f0eae609013c33d5c30.jpeg)
:max_bytes(150000):strip_icc():format(webp)/ScreenShot2022-04-29at4.40.34PM-00eb894f0c464f9ea019412681924fe0.png)
:max_bytes(150000):strip_icc():format(webp)/ScreenShot2022-04-29at4.46.00PM-aa634df98a6d436893b5b53a4164523c.png)
:max_bytes(150000):strip_icc():format(webp)/ScreenShot2022-04-29at4.47.34PM-78c79c92595a4549bdf5866b3d98c93a.png)
:max_bytes(150000):strip_icc():format(webp)/ScreenShot2022-04-29at4.54.51PM-e9a13b1d525145e181b24b691df13b46.png)
:max_bytes(150000):strip_icc():format(webp)/mindybriarphotography-22-620db5301dc7454a904a513e930b107d.jpeg)